
How to Allow Our Service Through Cloudflare?
Get our scans, backups, and connections through your Cloudflare firewall in a few minutes.
Quick fix (2 minutes): If Cloudflare is blocking our scans, backups, or site connection, it's almost always one custom rule on your account overriding Cloudflare's built-in trust for us. Create a single WAF Skip rule for our user agent. Jump to Step 1.
Why this happens (and why it's not a "you're not whitelisted" problem)
We are a registered Cloudflare Verified Bot. By default, Cloudflare already recognizes and allows our requests; no allowlist or IP rules are required on your side.
If our requests are suddenly being blocked, challenged, or met with a 403 or a "Just a moment…" page, it's not because Cloudflare doesn't know who we are. It's because a custom setting on your account is blocking us before we're recognized by the verified-bot allowlist.
The usual culprits:
| Setting | Where it lives in Cloudflare |
|---|---|
| Custom WAF / Firewall rules | Security → WAF → Custom rules |
| Bot Fight Mode / Super Bot Fight Mode | Security → Bots |
| "I'm Under Attack" mode | Overview → Quick Actions (or Security → Settings) |
| Country / IP restrictions | Security → WAF → Tools |
Each one has a clean fix. Work through the steps below; in most cases, Step 1 alone is enough.
1. Create one WAF rule that lets us through
This is the most reliable fix. We'll create a rule that tells Cloudflare: "If this request comes from us, skip the rest of my security rules."
Our service identifies itself with the same User-Agent on every request:
BlogVault/1.0 (+https://blogvault.net)(This covers all our products. BlogVault, MalCare, WP Remote, Airlift, and Migrate Guru use the same user-agent.)
To create the rule:
- In your Cloudflare dashboard, select your domain.
- Go to Security → WAF
- Under Custom rules, click Create rule
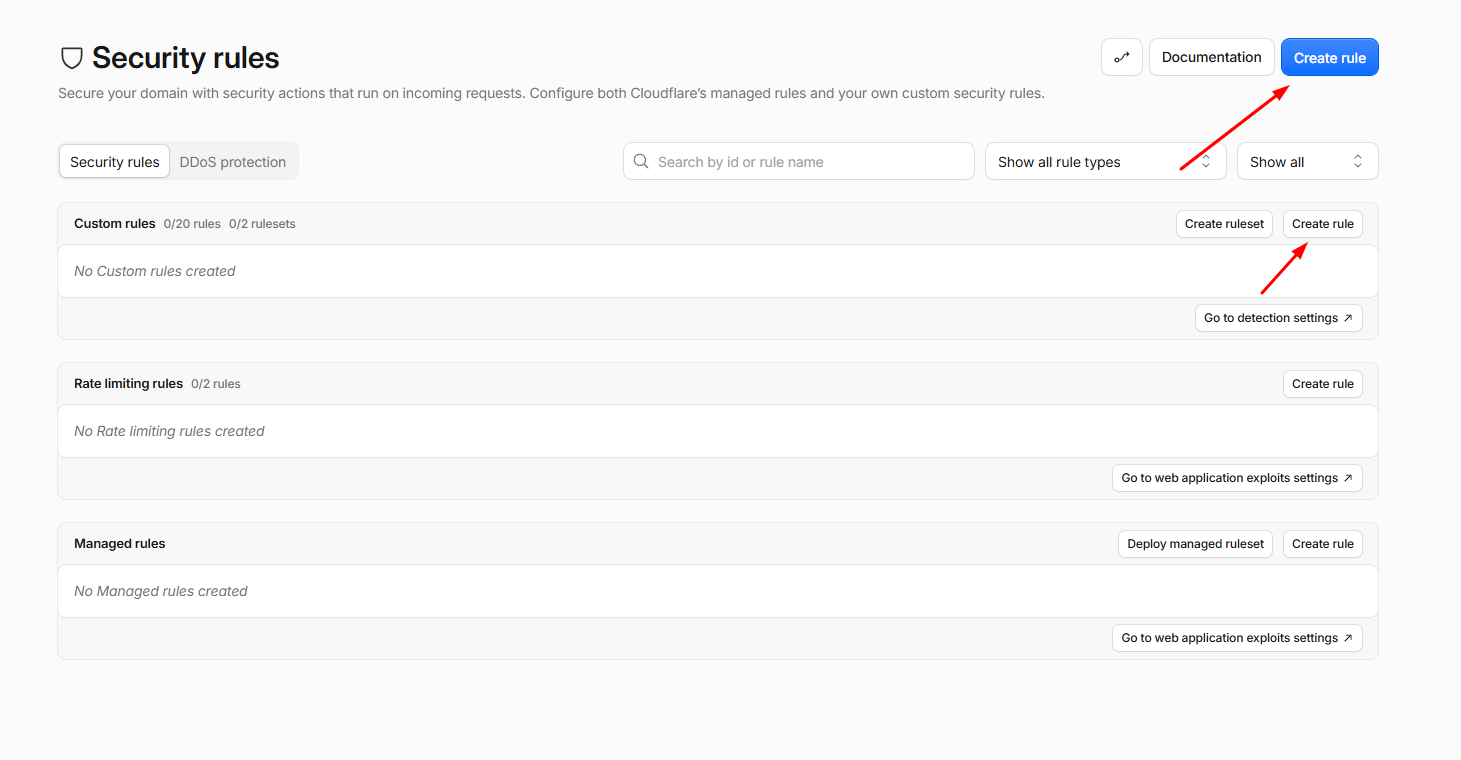
- Name it, e.g.
Allow BlogVault. - Build the condition:
- Field:
User Agent - Operator:
contains - Value:
BlogVault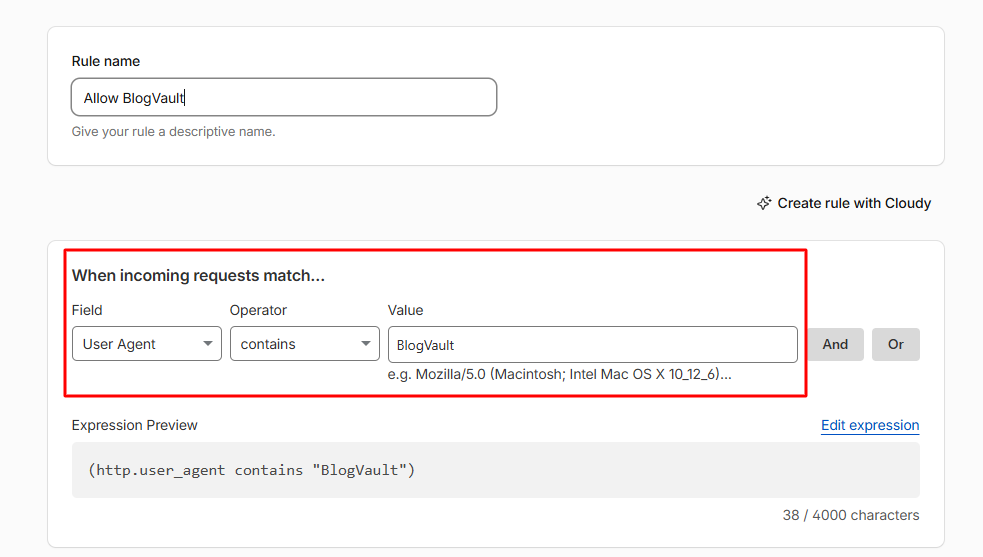
- Field:
- Under Then, take action, choose Skip.
- Choose what to skip — at a minimum, all remaining custom rules. (Selecting All Managed Rules as well is fine and recommended.)
- Click Deploy.
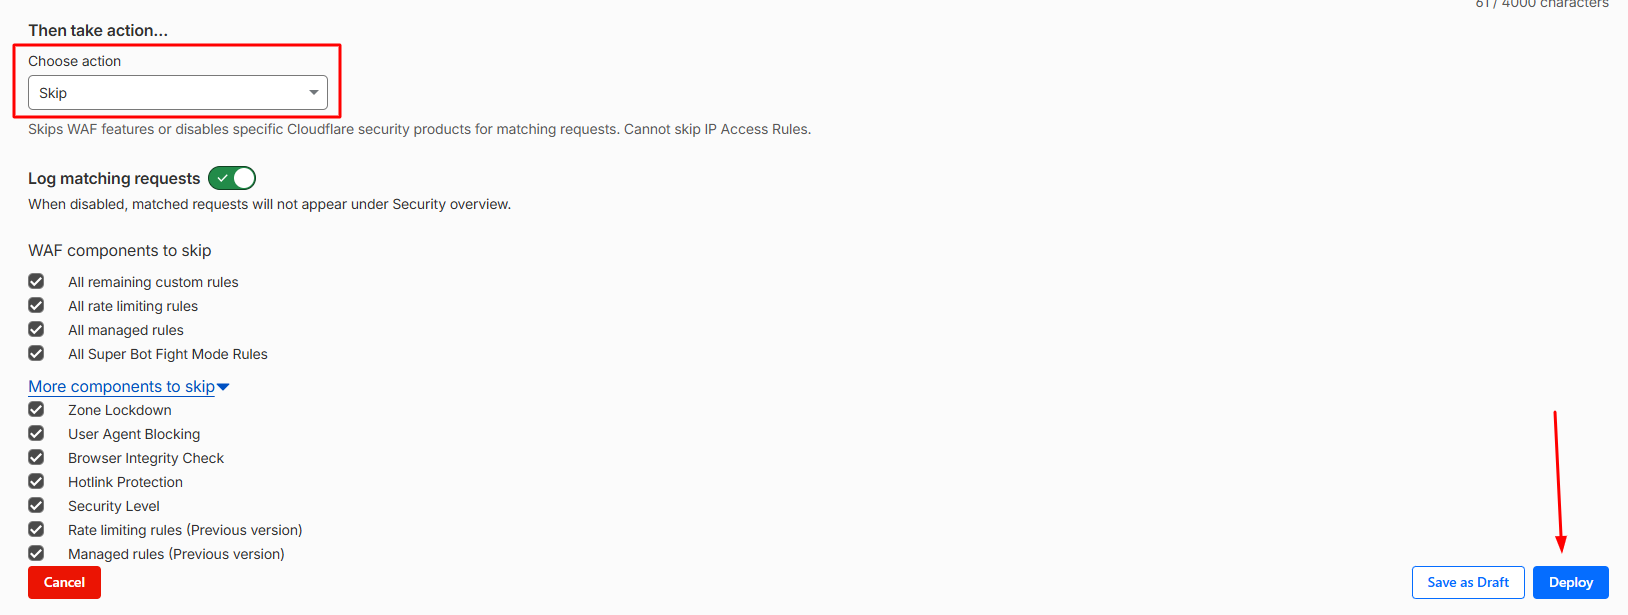
Done. Our requests now pass through your custom rules. Re-run your scan or retry the connection — it should go straight through.
Prefer the expression editor? The same rule in Cloudflare's wire-filter syntax is:
(http.user_agent contains "BlogVault")…with the action set to Skip.
2. Check your Bot protection settings
Even with a user-agent rule, aggressive bot protection can still challenge us. Two things to verify:
- Bot Fight Mode (Free plan): If it's on, the Skip rule above should cover it — but if scans still fail, turning it off is the cleanest test.
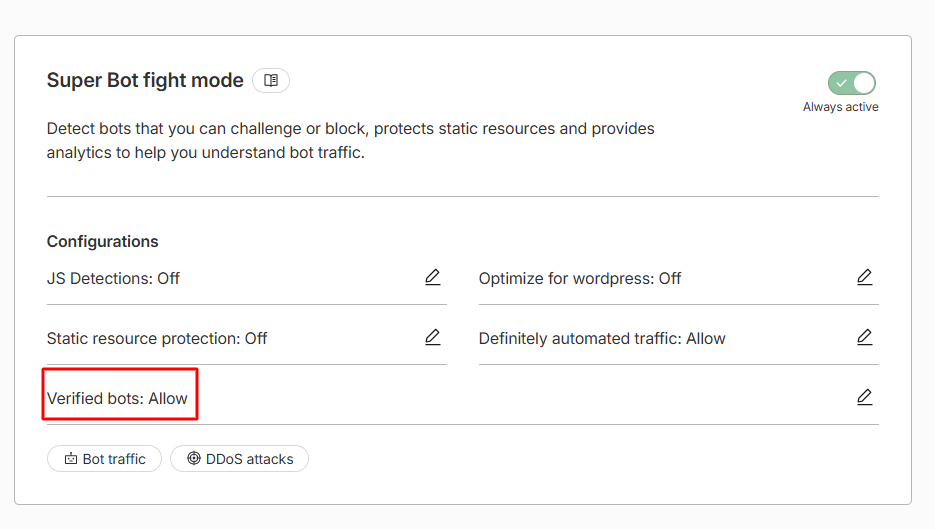
- Super Bot Fight Mode (Pro plan and above): This has a setting made for us. Make sure Verified bots are set to Allow. Because we're a verified bot, that single setting lets us through.
3. Turn off "I'm Under Attack" mode
Under Attack Mode forces a JavaScript challenge on every visitor, including verified bots, which can't solve interactive challenges. It's designed for an active attack, not for day-to-day protection, and it overrides our verified status.
If it's switched on, turn it off:
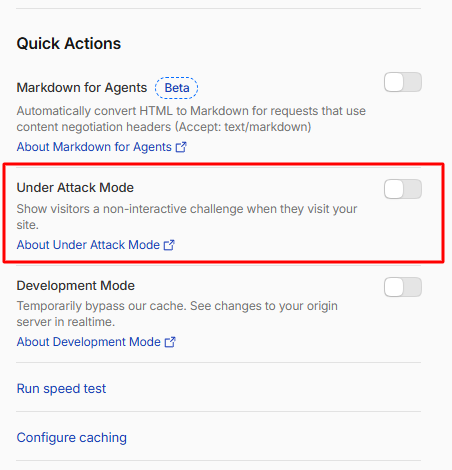
You'll find it under Overview → Quick Actions or Security → Settings.
4. Check country and IP restrictions
Our scanning servers run from both the US and the EU, and the specific IPs rotate over time. If you've set up country blocking or an IP allowlist:
- Make sure the US and Europe are not blocked.
- Don't allowlist individual IPs — they're dynamic and will go stale. (See "Do I need to whitelist your IPs?" below for the right approach.)
Find exactly which rule is blocking you (Ray ID)
Not sure which rule is the culprit? Cloudflare tags every request with a Ray ID. You can use it to see precisely what blocked a request and which rule fired:
To look it up:
- Go to Security → Analytics (or Security → Events).
- Click Add filter.
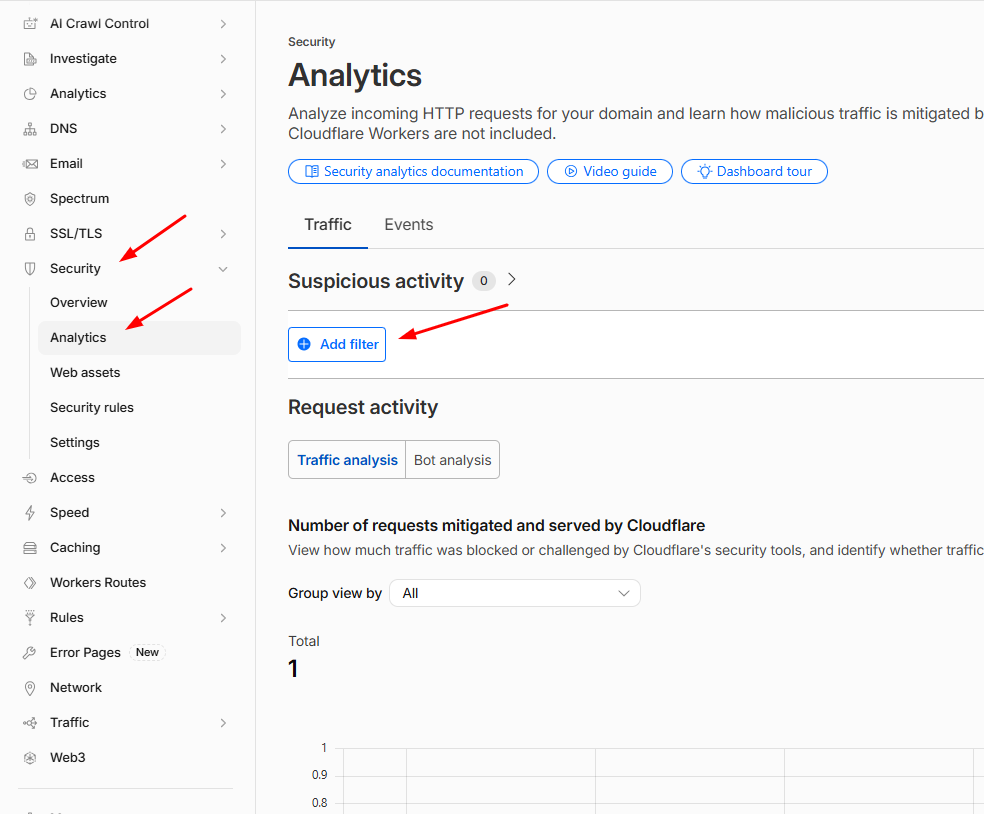
- Choose Ray ID, set the operator to equals, and paste your Ray ID.
- Click Apply.
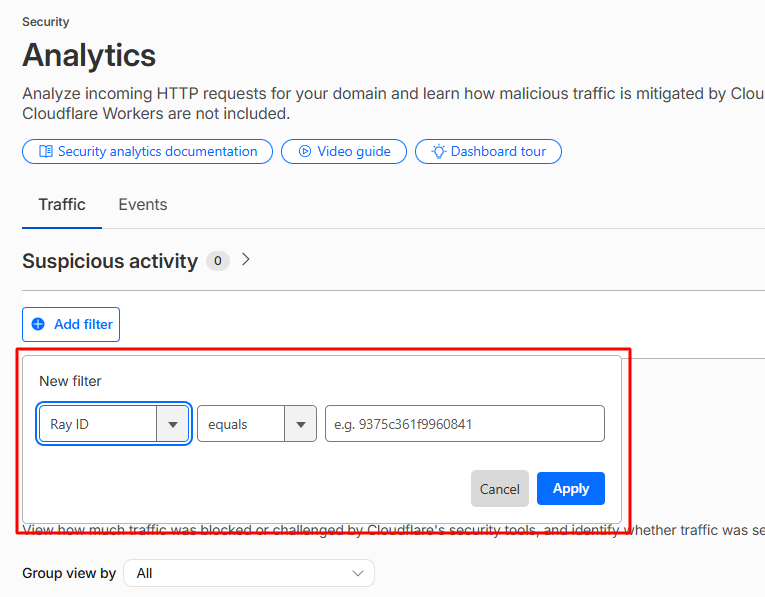
The result shows the blocked request along with the action taken, the service, and the rule that triggered it. Fix that specific rule — or add the Skip rule from Step 1 — and you're set.
Where do I get a Ray ID?
- If our scan failed, ask us, we can share the
cf-rayfrom the blocked request.- It's also printed at the bottom of any Cloudflare block or challenge page ("Cloudflare Ray ID: …").
- To find our requests yourself, filter Security → Analytics by User Agent → contains → BlogVault.
Frequently asked questions
Do I need to whitelist your IPs?
No, and we recommend against it. Our scanner IPs are dynamic and change periodically, so a static list goes stale fast. Being a verified bot is the correct, automatic mechanism here.
It worked before and just stopped. What changed?
Almost always, a new rule, a newly enabled bot setting, or Under Attack Mode got switched on between then and now. The Ray ID method above will tell you exactly which one.
Does letting you through weaken my security?
No. We're verified by Cloudflare and identified by a fixed User-Agent. A Skip rule scoped to that User-Agent affects only our requests — everything else on your site is untouched.
I applied the rule, and it's still blocked.
Rules can take a moment to propagate. If it persists, check that your rule is Deployed and placed above (higher priority than) any blocking rules, and that Bot Fight Mode / Under Attack Mode are off. If you're still stuck, message us with a Ray ID, and we'll pinpoint it together.
Still need a hand?
We're happy to help. Reach out to support with:
- Your site URL
- The product you're using (BlogVault, MalCare, WP Remote, Airlift, or Migrate Guru)
- A Ray ID from a blocked request, if you have one
…and we'll get it sorted.